ASP.NET MVCはじめました~データのキャッシュ
概要
データキャッシュの実装とテストについて調べてみました。
参考資料

プログラミングMicrosoft ASP.NET MVC 第3版ASP.NET MVC 5 対応版 (マイクロソフト公式解説書)
- 作者: Dino Esposito,井上章
- 出版社/メーカー: 日経BP社
- 発売日: 2014/10/30
- メディア: 単行本
- この商品を含むブログ (1件) を見る
ASP.NET MVCでのキャッシュについては、今のところ、キャッシュ機能をアプリケーションに注入する方法が推奨されています。
特定のキャッシュ機能の実装に依存しないようにキャッシュサービスを注入してあげれば良さそう。
環境
- Visual Studio Community 2017
- ASP.NET MVC5
キャッシュサービスの実装
インターフェイスと実装。インターフェイスは必要に応じて機能を追加します。書籍のサンプルコードではSystem.Web.CachingのCacheオブジェクトを使用していましたが、System.Runtime.CachingのMemoryCacheオブジェクトに置き換えてみました。
■/Framework/ICacheService.cs
public interface ICacheService
{
    Object Get(String key);
    void Set(String key, Object data);
    Object this[String key] { get; set; }
}
■/Framework/AspNetCacheService.cs
public class AspNetCacheService : ICacheService
{
    private readonly MemoryCache _memoryCache;
    public AspNetCacheService()
    {
        _memoryCache = MemoryCache.Default;
    }

    public object Get(string key)
    {
        return _memoryCache[key];
    }

    public void Set(string key, object data)
    {
        _memoryCache[key] = data;
    }

    public object this[string key]
    {
        get { return _memoryCache[key]; }
        set { _memoryCache[key] = value; }
    }
}
キャッシュサービスの注入
アプリケーションの起動時にキャッシュサービスを注入するためのパブリックなRegisterCacheServiceメソッドを用意しておくと、コントローラごとにサービスを注入する必要はなく、テストもできるって訳ですね。
■Global.asax.cs
public class MvcApplication : System.Web.HttpApplication
{
    protected void Application_Start()
    {
        ...

        RegisterCacheService(new AspNetCacheService());
        CacheService["StartTime"] = DateTime.Now.ToString();
    }

    private static ICacheService _internalCacheObject;

    public static void RegisterCacheService(ICacheService cacheService)
    {
        _internalCacheObject = cacheService;
    }

    public static ICacheService CacheService
    {
        get { return _internalCacheObject; }
    }
}
■HomeController.cs
public class HomeController : Controller
{
    public ActionResult Index()
    {
        var data = MvcApplication.CacheService["StartTime"];
        if (data != null)
        {
            ViewBag.StartTime = (String)data;
        }

        return View();
    }
}
キャッシュサービスのテスト
テストの時はモックを用意してRegisterCacheServiceメソッドに渡してあげる感じ。
■HomeControllerTests.cs
public class HomeControllerTests
{
    [TestMethod()]
    public void IndexTest_Cache()
    {
        var expected = "2017-04-15 12:00:00.000";
        var mockCacheService = new Mock<ICacheService>();
        mockCacheService.Setup(m => m["StartTime"]).Returns(expected);
        MvcApplication.RegisterCacheService(mockCacheService.Object);

        var controller = new HomeController();
        ViewResult result = controller.Index() as ViewResult;
        var actual = result.ViewBag.StartTime;

        Assert.AreEqual(expected, actual);
    }
}
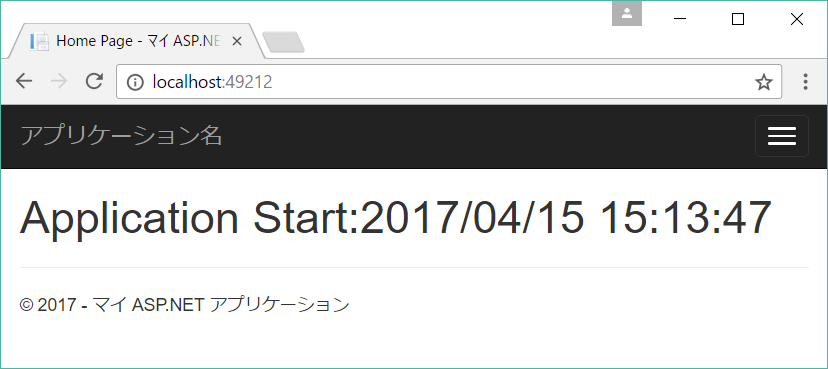
実行結果

参考資料

プログラミングMicrosoft ASP.NET MVC 第3版ASP.NET MVC 5 対応版 (マイクロソフト公式解説書)
- 作者: Dino Esposito,井上章
- 出版社/メーカー: 日経BP社
- 発売日: 2014/10/30
- メディア: 単行本
- この商品を含むブログ (1件) を見る
Visual Studio Community 2017 をインストールする
概要
Visual Studio Community 2017 をインストールします!*1
インストール
インストーラ起動![続行]を押す。

数分間お待ちください。

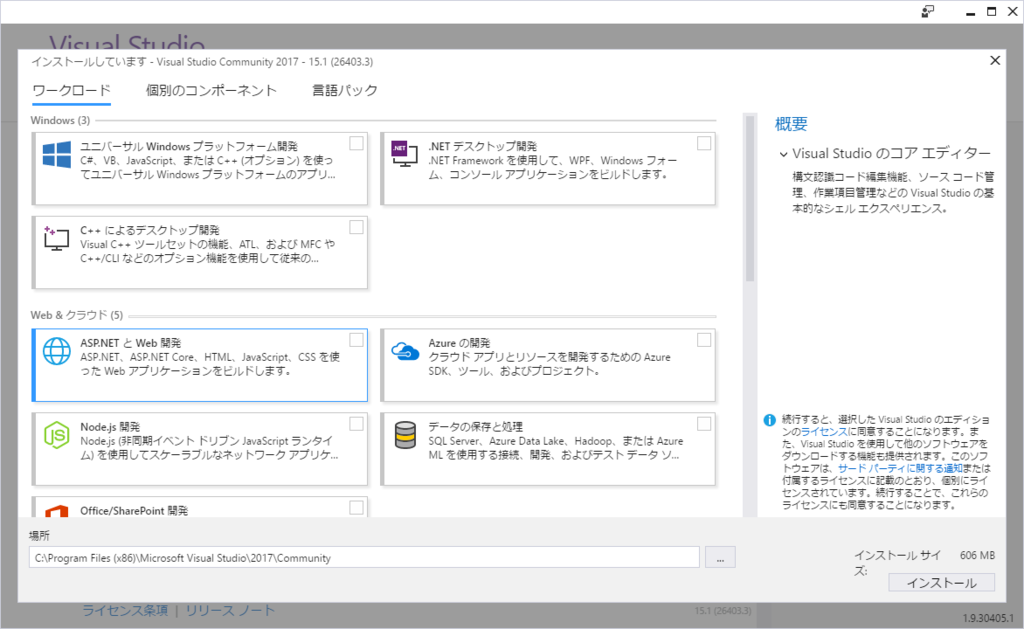
ワークロードを選択しないとインストールサイズは 606MB ですが...

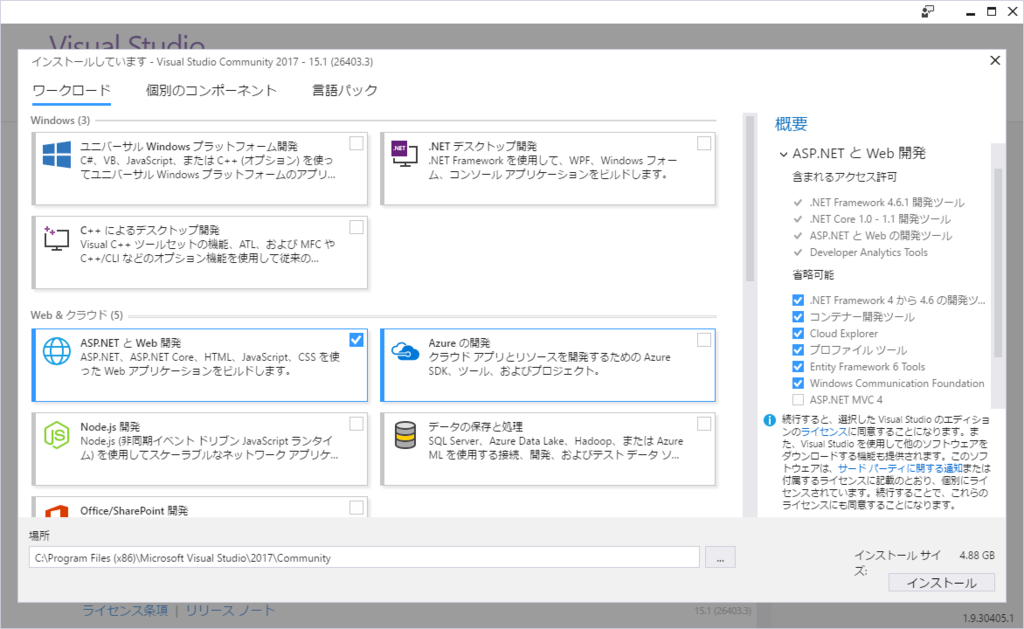
[ASP.NETとWeb開発]を選択してみると、サイズは 4.88GB になりました!ひとまずこれで[インストール]を押す。

インストールには1時間程度かかりました。

起動してみましょう!

起動
サインインしてみます。

別窓が上がり、二段階認証もクリア!RC版ではダメでしたけど解消されてますね。

VS Community 2017 が起動しました☆

RC版ではワークロードの選択で[Web開発]を選んだだけでは.NET Coreが入らなかったけど、[ASP.NETとWeb開発]に変更されてて、こっちでは.NET Coreがインストールされていました。

軽快なモジュール式インストール
https://www.visualstudio.com/ja/vs/community/
インストーラの[変更]からワークロードを追加してみます。

[.NETデスクトップ開発]、[Azureの開発]、[データの保存と処理]を追加で選択し、[変更]。

テンプレートが増えました。

不要になったらワークロードのチェックを外して[変更]することで必要なものだけが入った構成になります。
ASP.NET MVCはじめました~PDFを出力する
概要
TuesPechkinというライブラリを使ってPDFを出力するやり方について調べてみました。

環境
- Visual Studio Community 2015
- ASP.NET MVC5
- TuesPechkin 2.1.1
TuesPechkin?
Google翻訳してみたら「火器屋」って…物騒ですねぇ。以下、README.mdから。
TuesPechkin is a .NET Wrapper for the wkhtmltopdf library.
https://github.com/tuespetre/TuesPechkin
HTMLをPDFに変換してくれるwkhtmltopdfライブラリの.NETラッパーとあります。wkhtmltopdfというのが本体なんですね。
Azure Websites does not currently support the use of wkhtmltopdf.
https://github.com/tuespetre/TuesPechkin
試しにAzure App Serviceにデプロイしてみたけど現段階で動きませんでした。
You must have Visual C++ 2013 runtime installed to use these packages.
https://github.com/tuespetre/TuesPechkin
wkhtmltopdfがC++で書かれているからランタイムもないとダメなんすかね。
とりあえず、動かしてみましょう!
インストール
ライブラリのインストールはパッケージマネージャーコンソールより以下を実行。TuesPechkinライブラリも一緒にインストールされます。他にもTuesPechkin.Wkhtmltox.Win32とTuesPechkin.Wkhtmltox.Win64がそれぞれ用意されているので環境に合わせてって感じでしょうか。
PM> Install-Package TuesPechkin.Wkhtmltox.AnyCPU
実装
HTMLをPDFに変換してくれるってことは、出力したいイメージのViewを作成してあげればOKと理解したので、以前作ったToDoリストをPDF化してみます。ちょっと面倒なのはレイアウトページを使っているとヘッダーやフッターまで一緒に出力されてしまうので、Indexページをそのまま出力するんじゃなく、PDF出力用のIndexViewを用意しなきゃいけないとこですかね。
■/Controllers/ReportController.cs
public class ReportController : Controller
{
    ...
    public ActionResult TodoReport()
    {
        var pdfData = CreatePDF("Todo", "Report", null);

        return File(pdfData, "application/pdf", "TodoReport.pdf");
    }

    private byte[] CreatePDF(string actionName, string controllerName, object routeValues = null)
    {
        var helper = new UrlHelper(ControllerContext.RequestContext);
        var indexUrl = helper.Action(actionName, controllerName, routeValues, Request.Url.Scheme);

        return _service.Create(indexUrl);
    }
}
■/Services/Report/ReportService.cs
public class ReportService : IReportService
{
    ...
    public byte[] Create(string indexUrl)
    {
        var document = new HtmlToPdfDocument()
        {
            GlobalSettings =
            {
                ProduceOutline = true,
                DocumentTitle = "PDF Sample",
                PaperSize = PaperKind.A3,
                Margins =
                {
                    All = 1.375,
                    Unit = Unit.Centimeters
                }
            },
            Objects =
                {
                    new ObjectSettings()
                    {
                        PageUrl = indexUrl,
                    },
                }
        };

        var converter = new StandardConverter(
            new PdfToolset(
                new WinAnyCPUEmbeddedDeployment(
                    new TempFolderDeployment())));
        var pdfData = converter.Convert(document);

        return pdfData;
    }
}
実行結果
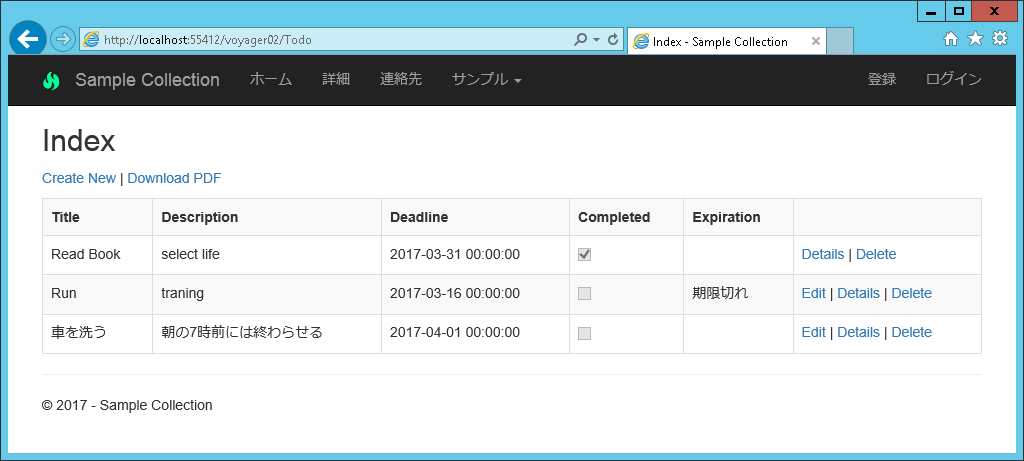
ToDoリストのIndexページの[Download PDF]リンクからPDFをダウンロードします。ただ、出力したいのはデータ部分のみ。ヘッダーもフッターも余計なリンクとかもいらないですね。

なので出力イメージのView(レイアウトページ使用なし)を用意しておきます。Viewなのでブラウザで見ることも可能。
※PDF出力の際に表示されるわけではありません。

ダウンロードリンクを押下すると、PDF出力処理が走って出力イメージのViewをPDFに変換してくれます。そして、Viewの通りに出力されました!BootStrapを使ってますが、問題なく理解してくれてますね!

